Imagine a scorching summer day, with the heat becoming unbearable. You decide it’s time to install a pre-charged AC unit and bring some cool relief into your space. But, where to begin? In this article, we will guide you through the process of installing a pre-charged AC unit, helping you stay comfortable throughout those sweltering hot days. From selecting the perfect location to connecting the necessary components, we’ve got you covered. So, let’s roll up our sleeves and get started on creating a cool oasis in your home.

Gather the Necessary Tools and Materials
Before you begin installing your pre-charged AC unit, it’s important to gather all the tools and materials you’ll need for the job. Start by checking the contents of the package to ensure that you have everything required. Look for items such as mounting brackets, screws, electrical wires, refrigerant lines, and the AC unit itself.
If the package is missing any essential tools or materials, it’s crucial to acquire them before proceeding with the installation. This might include additional tools like a drill, screwdriver, or wrenches, as well as any missing components specific to your AC unit model.
Choose a Suitable Location for the AC Unit
Selecting the right location for your AC unit is crucial for efficient and effective cooling. Consider the size and weight of the unit to ensure that it can be adequately supported by the chosen location. Evaluate the space requirements, taking into account both the dimensions of the unit and the necessary clearance for air circulation.
Also, make sure to check for proximity to electrical outlets. It’s essential to have a power source nearby, as the AC unit will require electricity to function. If there are no outlets close to the installation area, you may need to consult an electrician to install a new one.
Prepare the Installation Area
Before installing the AC unit, it’s necessary to prepare the installation area properly. Clear the area of any obstacles such as furniture, boxes, or debris. This will ensure that you have sufficient working space and reduce the risk of accidents.
If the surface where you plan to install the unit is not entirely level, it’s a good idea to level it before proceeding. A completely level surface will help ensure the stability and longevity of the AC unit. Additionally, consider covering the area with a protective sheet or mat to prevent any damage or scratches to the unit or the installation surface.
Inspect and Prepare the AC Unit
Before mounting the AC unit, it’s important to inspect it for any shipping or manufacturing damage. Look for signs of dents, scratches, or other issues that may affect its performance. If you notice any damage, contact the manufacturer for guidance on how to proceed.
Remove any protective covers or packaging from the unit as per the manufacturer’s instructions. These protective elements are intended to keep the unit safe during transportation and must be removed before installation to avoid any interference with its operation.
Take a moment to verify that the AC unit is compatible with your electrical system. Check the electrical requirements, such as voltage and current, and ensure that your electrical system can safely accommodate the unit. If you have any doubts or questions, consult a professional electrician for guidance.

Mount the AC Unit
To mount the AC unit properly, you should refer to the manufacturer’s instructions, which will provide detailed guidance specific to your unit model. Follow the instructions carefully to ensure a secure and safe installation.
Using appropriate hardware and mounting brackets provided with the unit, secure the unit to the mounting surface. Double-check the alignment and stability of the unit to ensure it is properly positioned and won’t shift or move after installation. This is critical for both the performance and longevity of the AC unit.
Connect the Electrical Wiring
Before connecting the electrical wiring, it’s crucial to turn off the electrical supply to the area where the AC unit will be installed. This will prevent any potential electrical hazards during the installation process.
Remove the electrical access panel, which is typically located on the side or back of the unit. Follow the wiring installation instructions provided by the unit’s manual and/or the manufacturer. Connect the wiring according to these guidelines, making sure to follow proper safety precautions.
Ensure that the electrical connections are made securely, and check for proper grounding and insulation to prevent any electrical mishaps or damage to the AC unit.

Install the Condensate Drain Line
Locate the condensate drain port on your AC unit. This is typically located towards the bottom of the unit. Attach the drain line or hose securely to the drain port, ensuring a tight connection.
To ensure proper drainage, make sure the drain line has a slight slope downward, allowing any condensate to flow freely. This will prevent any potential water buildup and ensure efficient operation of the AC unit. Finally, secure the drain line to prevent any leaks or displacement.
Connect the Refrigerant Lines
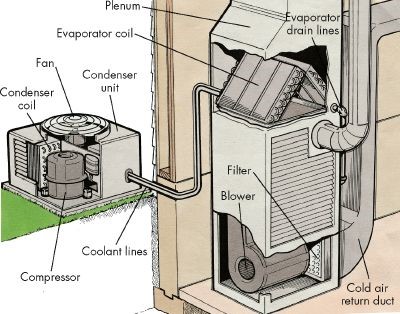
Identify the refrigerant lines on your AC unit. These lines are responsible for carrying the refrigerant, which is essential for the cooling process. Remove any caps or plugs from the refrigerant line connections.
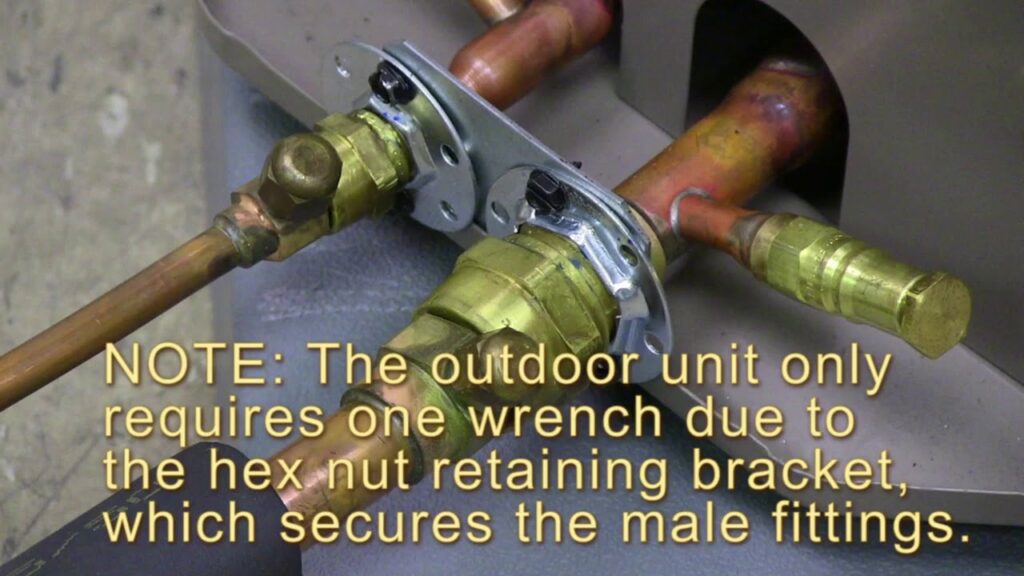
Attach the refrigerant lines securely using the proper fittings provided with the unit. The connections should be tightened appropriately to prevent any refrigerant leaks. Once the connections are made, it’s essential to check for any signs of leakage, such as hissing sounds or visible refrigerant. If you notice any leaks, consult a professional for assistance.

Install the Air Filters
Locate the air filter slots on your AC unit. These slots are usually situated at the front or side of the unit. Insert the air filters according to the manufacturer’s instructions. Follow the recommended orientation and placement of the filters for optimal performance.
Air filters play a crucial role in maintaining clean and healthy indoor air quality. It’s important to replace or clean the filters regularly, as recommended by the manufacturer, to ensure maximum efficiency of your AC unit and to prevent the buildup of dust and allergens.
Test the AC Unit
Once everything is installed and connected, it’s time to test your AC unit. Turn on the power supply and set the desired temperature and mode on the unit. Observe the unit for proper operation and airflow.
Check if the unit is cooling the air efficiently and evenly throughout the room. Monitor for any unusual sounds or issues that may indicate a problem. If you notice anything out of the ordinary, consult the manufacturer’s troubleshooting guide or consider contacting a professional for assistance.
Regularly testing and monitoring your AC unit’s performance will help ensure its longevity and efficiency, providing you with a comfortable, cool environment during the hot summer months.


