Looking to beat the summer heat by installing an AC unit in your home? Look no further! This article will guide you through the step-by-step process of installing an AC unit, ensuring you can create a cool and comfortable environment in your living space. From choosing the perfect location to wiring and mounting the unit, we’ve got you covered. Say goodbye to sweltering temperatures and hello to a refreshing summer breeze. Let’s get started!
Choosing the Right AC Unit
When it comes to choosing the right AC unit for your space, it’s important to consider a few factors. First, you’ll need to determine the cooling capacity needed. This is typically measured in British Thermal Units (BTUs) and depends on the size of the room or area you want to cool. It’s important to choose a unit with the appropriate cooling capacity to ensure efficient and effective cooling.
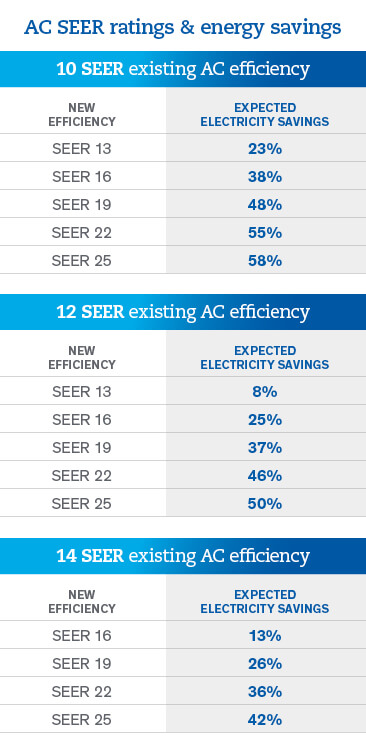
In addition to cooling capacity, energy efficiency ratings should also be taken into account. Look for units that have a high Seasonal Energy Efficiency Ratio (SEER) rating. The higher the SEER rating, the more energy-efficient the unit is, which can save you money on your utility bills in the long run.
Lastly, you’ll need to select the appropriate type of AC unit for your needs. There are several options to choose from, including window units, central air conditioning systems, ductless mini-split systems, and portable units. Consider factors such as your budget, the layout of your space, and any specific requirements or restrictions you may have.
Preparing for the Installation
Before you begin installing your AC unit, it’s important to properly prepare the installation location. Assess the area where you plan to install the unit and ensure that it has enough space and proper ventilation. This will help optimize its performance and prevent any potential issues down the line.
Next, check the electrical requirements of the unit. Make sure that the electrical circuit can handle the load of the AC unit and ensure that you have the necessary electrical connections and wiring in place.
Gathering the necessary tools and materials before starting the installation process is also crucial. Depending on the type of AC unit you’ve chosen, you may need tools such as a drill, screwdriver, level, and tape measure. Additionally, make sure you have all the required materials and components, such as the mounting bracket, refrigerant lines, and condensate drain.

Installing the AC Unit
Once you’re ready to begin the installation, follow these steps to ensure a successful and secure installation:
-
Position the unit on a stable surface: Place the AC unit on a stable surface, such as a window sill or mounted bracket, to prevent any movement or instability during operation.
-
Mount the mounting bracket: If your AC unit requires a mounting bracket, follow the manufacturer’s instructions to properly install and secure it to the wall or window frame.
-
Securely attach the unit to the bracket: Carefully attach the AC unit to the mounting bracket, ensuring that it is securely fastened to prevent any potential accidents or damage.
-
Connect the refrigerant lines: If your AC unit requires refrigerant lines, connect them according to the manufacturer’s instructions. Be sure to use proper seals and fittings to prevent any leaks.
-
Install the condensate drain: Depending on the type of AC unit, you may need to install a condensate drain to help remove excess moisture. Follow the manufacturer’s instructions for installation.
-
Connect electrical wiring: Carefully connect the electrical wiring of the AC unit, ensuring that all connections are secure and properly insulated. If you’re unsure about electrical work, it’s always best to hire a professional.
-
Test the AC unit: Once you’ve completed the installation, test the AC unit to ensure that it’s running properly. Adjust the settings, listen for any unusual noises, and check for proper cooling.
Creating a Weatherproof Seal
To ensure optimal performance and energy efficiency, creating a weatherproof seal around the AC unit is essential. Follow these steps to properly seal your AC unit:
-
Apply weatherstripping around the unit: Weatherstripping helps create a tight seal between the unit and the window or wall. Apply weatherstripping along the edges of the unit to prevent any air leaks.
-
Seal any gaps or cracks in the wall: Inspect the area around the installation location for any gaps or cracks. Use caulk or sealant to fill in these gaps and ensure a secure and weatherproof seal.
-
Ensure proper insulation: Proper insulation around the AC unit is important to prevent any air leakage and maintain the desired temperature indoors. Make sure the insulation is in good condition and not damaged or worn out.

Completing the Installation
After installing and weatherproofing your AC unit, there are a few final steps to complete the installation process:
-
Check for proper ventilation: Ensure that the area around the AC unit has proper ventilation for optimal air circulation. Clear any obstacles or obstructions that may hinder airflow.
-
Verify proper airflow: Once the AC unit is running, check for proper airflow both indoors and outdoors. Make sure there are no blockages or restrictions that could affect the efficiency of the unit.
-
Install the air filter: Most AC units have an air filter that helps remove dust and debris from the air. Install the air filter according to the manufacturer’s instructions and clean or replace it regularly to maintain good air quality.
-
Program the thermostat: If your AC unit has a programmable thermostat, set it according to your desired temperature preferences. This will help ensure that your space remains cool and comfortable while also saving energy.
-
Clean up and dispose of packaging materials: Once the installation is complete, gather and dispose of any packaging materials in an appropriate manner. Keep your workspace clean and tidy for a safe and efficient installation.
Safety Considerations
When installing an AC unit, it’s important to prioritize safety. Follow these safety considerations to minimize the risk of accidents or injuries:
-
Turn off the power: Before starting any electrical work, ensure that the power is turned off at the main electrical panel to prevent electric shocks or other electrical hazards.
-
Use caution when handling refrigerant: Refrigerant is a potentially hazardous substance, so use caution when handling it. Avoid direct contact with the refrigerant and follow proper safety precautions.
-
Follow electrical safety precautions: When working with electrical connections and wiring, make sure to follow electrical safety precautions. This includes wearing insulated gloves, avoiding wet conditions, and using appropriate tools.
-
Wear protective gear: When working with tools and materials, wear appropriate protective gear, such as safety goggles, gloves, and closed-toe shoes. This will help protect against injuries or accidents.

Troubleshooting
Sometimes, even with careful installation, issues may arise. Here are a few troubleshooting tips to help you address common installation problems:
-
Common installation issues: If your AC unit isn’t functioning properly, check for common installation issues, such as loose connections, improper wiring, or a faulty thermostat. Revisit the installation steps to ensure everything is correctly installed.
-
Checking for leaks in refrigerant lines: If your AC unit is leaking refrigerant, it can affect its performance and efficiency. Inspect the refrigerant lines for any signs of leaks, such as oil stains or hissing sounds. If you detect a leak, it’s best to contact a professional for repairs.
-
Diagnosing electrical problems: If you’re experiencing electrical issues with your AC unit, such as frequent tripping of the circuit breaker, be cautious. Check the electrical connections, wiring, and circuit breaker to identify any potential problems. If you’re unsure, consult a professional electrician.
Maintenance Tips
To keep your AC unit running smoothly and efficiently, regular maintenance is essential. Here are a few maintenance tips to keep in mind:
-
Regularly clean the air filters: Dirty air filters can obstruct airflow and reduce the efficiency of your AC unit. Clean or replace the air filters regularly, depending on the manufacturer’s recommendations.
-
Inspect and clean the condenser coils: Over time, the condenser coils can accumulate dirt and debris, affecting the performance of your AC unit. Inspect the coils regularly and clean them as needed to maintain optimal cooling.
-
Keep the outdoor unit free from debris: The outdoor unit of your AC system can attract leaves, grass, and other debris. Regularly clear away any debris to prevent it from obstructing airflow or damaging the unit.
-
Schedule professional maintenance: Consider scheduling regular professional maintenance for your AC unit. A qualified technician can inspect and clean the components, check for any potential issues, and ensure that your unit is running at its best.

Benefits of Professional Installation
While it’s possible to install an AC unit yourself, there are several benefits to hiring a professional for the installation process:
-
Ensures proper sizing and installation: A professional installer can accurately assess the cooling requirements of your space and recommend the right-sized unit. They have the expertise to install the unit correctly, ensuring optimal performance and energy efficiency.
-
Reduces the risk of damage or injury: AC unit installation involves electrical work and handling heavy equipment. Hiring a professional reduces the risk of electrical accidents, property damage, or personal injuries that could occur during the installation process.
-
Provides warranty coverage: Many AC units come with manufacturer warranties that require professional installation for the warranty to remain valid. Hiring a professional ensures that your warranty coverage is intact, giving you peace of mind.
-
Expert troubleshooting and maintenance: If any issues arise with your AC unit, a professional installer has the knowledge and experience to diagnose and troubleshoot the problem. They can also provide regular maintenance to keep your unit in excellent condition.
Conclusion
Installing an AC unit can make a significant difference in creating a cool and comfortable indoor environment. By choosing the right unit, preparing for the installation, following proper installation steps, and maintaining the unit regularly, you can enjoy the benefits of efficient cooling while saving energy and reducing utility costs. Whether you choose to install the unit yourself or hire a professional, ensuring the longevity and performance of your AC unit will create a more enjoyable living or working space for years to come.