So you’ve just gotten a new AC unit and now you’re faced with the daunting task of figuring out how to find the low pressure side. Don’t worry, we’ve got you covered. In this article, we’ll walk you through the steps to locate the low pressure side of your AC unit, making the process as simple and as stress-free as possible. By the end, you’ll feel confident in your ability to tackle any AC unit related challenge that comes your way. Let’s get started!
Understanding AC Units
When it comes to understanding AC units, it’s important to familiarize yourself with the various components and systems that make up these cooling systems. By understanding how an AC unit works, you can easily locate and identify the low pressure side, which is crucial for proper maintenance and troubleshooting.
Components of an AC Unit
AC units consist of several key components that work together to cool and circulate air. These include the compressor, condenser, evaporator, expansion valve, and refrigerant lines. Each component plays a vital role in the overall functioning of the AC unit, and understanding their purpose will help you in locating the low pressure side.

The Pressure System
AC units operate based on the principles of refrigeration, which involve the circulation and transformation of refrigerant between high and low pressure states. The low pressure side is responsible for drawing in cool air, while the high pressure side is responsible for releasing hot air. To properly locate the low pressure side, it’s important to understand how the pressure system works.
Locating the Low Pressure Side
Identifying the low pressure side of an AC unit is essential for tasks such as recharging the system or diagnosing issues. Here are some steps to help you locate the low pressure side effectively:
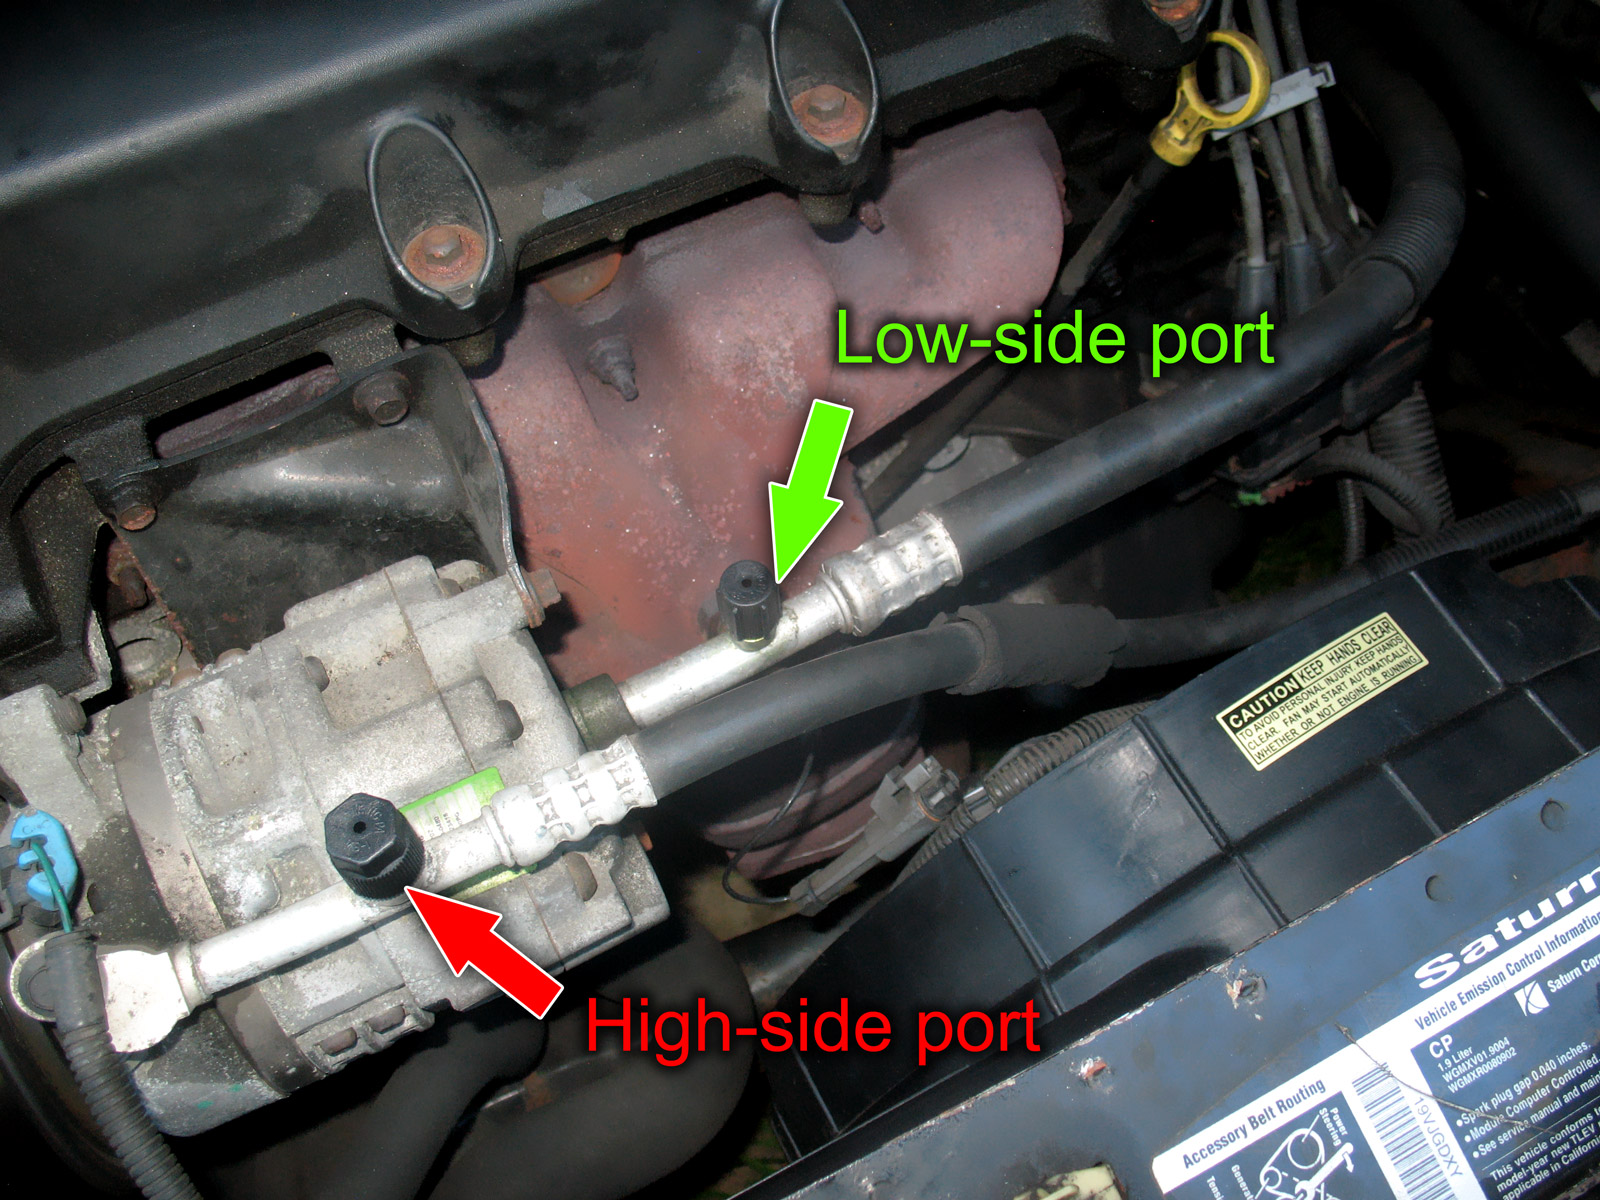
Identifying the Pressure Ports
The first step in locating the low pressure side is to find the pressure ports on your AC unit. These ports are typically located on either the high or low side of the system, and they allow you to connect pressure gauges and other tools. The low pressure port will be marked with an “L” or “LOW” label to differentiate it from the high pressure port.
Using the Manufacturer’s Manual
If you’re having trouble locating the pressure ports, consulting the manufacturer’s manual is always a good idea. The manual will provide detailed instructions specific to your AC unit and its design. It may also include diagrams or illustrations to help you easily identify the low pressure side.
Inspecting the Compressor
The compressor is an important component of the AC unit. It pressurizes the refrigerant and circulates it throughout the system. By inspecting the compressor, you can often find clues that will lead you to the low pressure side. Look for any labels or markings that indicate the location of the low pressure line or port.
Identifying the Refrigerant Lines
The refrigerant lines are another key component to consider when locating the low pressure side. These lines connect the various components of the AC system, and they often differ in size and shape. The low pressure line is typically larger in diameter compared to the high pressure line. By visually inspecting the lines, you can usually identify which one is the low pressure line.
Checking the Service Valve
The service valve is often found near the low pressure line and port. This valve is used to control and regulate the flow of refrigerant within the system. By following the low pressure line, you can usually locate the service valve, which will give you further confirmation that you’re on the right track in finding the low pressure side.

Using Pressure Gauges
Once you have successfully located the low pressure side of your AC unit, you can use pressure gauges to measure and monitor the pressure levels. Here are the steps to follow when using pressure gauges:
Selecting the Correct Gauge
There are different types of pressure gauges available, so it’s important to use the correct gauge for your AC unit. The gauge should be compatible with the refrigerant used in your system and able to measure the appropriate pressure range.
Prepping the Gauge
Before attaching the gauge, it’s important to inspect it for any damage or defects. Make sure the gauge is clean and properly calibrated. If necessary, refer to the manufacturer’s instructions for gauge preparation.
Attaching the Gauge to the Low Pressure Side
Attach the pressure gauge to the low pressure port on your AC unit. Ensure a secure and tight connection to prevent any leaks. Take caution when handling the gauge and avoid applying excessive force that could damage the port or the gauge itself.
Reading the Gauge
Once the gauge is properly attached, you can start the AC unit and observe the pressure readings. The gauge will display the current pressure level of the low pressure side. Make sure to let the unit run for a few minutes to stabilize the pressure before making any assessments.
Interpreting the Pressure
By comparing the pressure reading on the gauge to the manufacturer’s specifications, you can determine if the pressure is within the normal range. If the pressure is too low or too high, it may indicate an issue with the AC unit that requires further investigation.
Observing Physical Traits
In addition to using pressure gauges, you can also observe the physical traits of your AC unit to help you locate the low pressure side. Here are some traits to look out for:
Finding the Larger Refrigerant Line
As mentioned earlier, the low pressure line is typically larger in diameter compared to the high pressure line. By visually inspecting the refrigerant lines, you can easily identify which one is the low pressure line.
Locating the Suction Line
The low pressure line is often referred to as the suction line. It connects the evaporator and the compressor, allowing the refrigerant to flow in a continuous cycle. By following the suction line, you can trace it back to the low pressure side.
Identifying the Accumulator or Receiver-Drier
The accumulator or receiver-drier is another component that can help you locate the low pressure side. It acts as a storage vessel for excess refrigerant and absorbs any moisture present in the system. The accumulator is typically found on the low pressure side of the AC unit, making it a useful reference point.
Spotting the Expansion Valve or Orifice Tube
The expansion valve or orifice tube is responsible for regulating the flow of refrigerant into the evaporator. This component is often located near the low pressure line and can serve as another indicator of the low pressure side.

Tracing the Refrigerant Flow
Tracing the flow of refrigerant within your AC unit is another helpful method for locating the low pressure side. By understanding the path of the refrigerant, you can easily identify the connection points of the high and low pressure sides.
Following the Path of Refrigerant
Start by identifying the components of your AC unit and understanding how they are connected. Visualize the path that the refrigerant takes as it circulates through the system. By following this path, you can trace it back to the low pressure side.
Understanding the High and Low Pressure Side Connection Points
The high pressure and low pressure sides of the AC unit are connected through the refrigerant lines. By locating the connection points, you can determine which side is the low pressure side. These connection points are often found near the compressor or service valve.
Using a Leak Detection Kit
If you’re having trouble locating the low pressure side, a leak detection kit can be a handy tool. These kits utilize a special dye that can be injected into the AC system. The dye will circulate with the refrigerant and help you visually identify any leaks. By following the path of the dye, you can trace it back to the low pressure side.
Tracing the System with UV Dye
Similar to a leak detection kit, UV dye can be used to trace the flow of refrigerant within your AC unit. By adding UV dye to the system, you can use a UV light to locate any leaks or to track the refrigerant flow. This method can be especially useful when trying to identify the low pressure side in complex AC systems.
Tools Required
To effectively locate the low pressure side of an AC unit, certain tools are necessary. Here are some tools you’ll need:
Safety Gear
Before working on your AC unit, it’s important to prioritize your safety. Wear safety goggles, gloves, and appropriate clothing to protect yourself from any leaks, chemicals, or sharp edges.
Pressure Gauges
Pressure gauges are essential for measuring and monitoring the pressure levels in your AC unit. Make sure to select the correct gauge that is compatible with your system and refrigerant.
Leak Detection Kit
A leak detection kit is useful for locating any leaks in your AC system. It typically contains a dye and a UV light that helps you visually identify leaks and trace the refrigerant flow.
UV Dye
UV dye is another tool that can aid in locating the low pressure side of your AC unit. It can be added to the system and tracked using a UV light to identify leaks and trace the flow of refrigerant.

Safety Precautions
Working with AC units requires adherence to certain safety precautions to ensure your well-being and the proper functioning of the system. Here are some safety precautions to keep in mind:
Turning Off the Power
Before performing any maintenance or troubleshooting tasks, always turn off the power to your AC unit. This prevents any accidental electrical shocks or damage to the system.
Allowing the System to Cool Down
AC units can generate a significant amount of heat during operation. To avoid burns or injuries, allow the system to cool down before working on it. Give it ample time to reach a safe temperature.
Avoiding Direct Skin Contact
Refrigerant chemicals can be harmful if they come into direct contact with your skin. Always avoid touching the refrigerant or any components that have been in contact with it. Wear gloves and handle the system with care.
Releasing Pressure Safely
When working with pressure gauges or conducting maintenance on the AC unit, always release the pressure safely. Follow the manufacturer’s instructions to ensure you don’t accidentally release refrigerant into the environment or cause any damage to the system.
Common Challenges
Locating the low pressure side of an AC unit can sometimes pose challenges due to various factors. Here are some common challenges you may encounter:
Hidden Pressure Ports
In certain AC systems, the pressure ports may be hidden or located in hard-to-reach areas. If you’re having difficulty finding the pressure ports, refer to the manufacturer’s manual or consult a professional for assistance.
Missing or Faded Labels
Labels or markings on the AC unit that indicate the low pressure side may sometimes be missing or faded. This can make locating the low pressure side more challenging. In such cases, rely on other methods such as visual inspection or following the refrigerant lines to identify the low pressure side.

When to Consult a Professional
While locating the low pressure side of an AC unit can often be done by following the steps outlined earlier, there may be situations where consulting a professional is necessary. Here are some instances when it’s best to seek professional help:
Lack of Experience or Knowledge
If you’re unsure about your ability to locate the low pressure side or if you lack experience in working with AC units, it’s always best to consult a professional. They have the knowledge and expertise to safely and accurately identify the low pressure side.
Complex AC System
Some AC units have complex designs or configurations that make it more challenging to locate the low pressure side. In these cases, a professional technician can navigate the system efficiently and effectively locate the low pressure side.
Safety Concerns
If you have any concerns about your safety or if you suspect a major issue with your AC system, it’s important to consult a professional. They can assess the situation and provide appropriate solutions while ensuring your safety.
Conclusion
Understanding how to find the low pressure side of an AC unit is essential for proper maintenance and troubleshooting. By following the steps outlined in this article, you can confidently locate the low pressure side and effectively monitor and maintain your AC unit. Remember to prioritize safety and consult a professional if you encounter any challenges or have concerns. With this knowledge, you’ll be able to keep your AC unit running smoothly and enjoy the comfort of a cool and well-functioning space.